In the nick of time
This week: Explosive dehiscence; Caught in the nick of time; The non-standard EU; Sparks fly; The smallest room;

A little rain overnight a couple of times this week has refreshed the gardens and orchards, which were starting to look decidedly dry.
This rainfall was deposited as late winter snow on the top of the Dinaric Alps. The sunlight made the peaks shine, as I went down into town this week.
We are a little bit above the normal winter precipitation average with just three weeks left of the winter wet season. Even so, I have already had to irrigate some plants that were looking stressed.
Almost all of the blossom has fallen from the red plum, with the lovely bronze foliage shining in the sunshine.

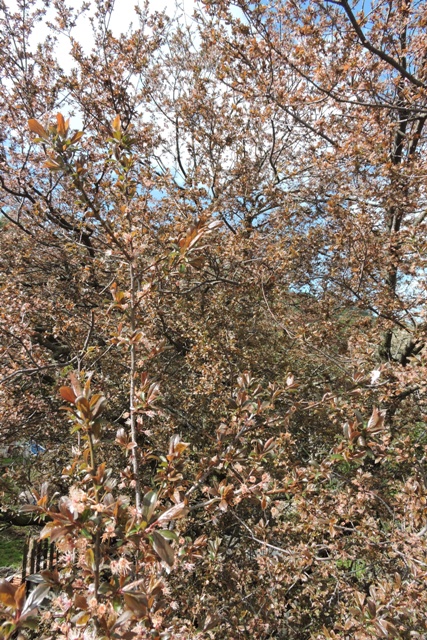
Elsewhere buds are just starting to burst on the pear trees while the buds swell daily on the apples, medlar and persimmons.
After last week’s mention of my research into a garden excavator, one of the many readers of the blog sent me a photo of a useful digger he has access to.
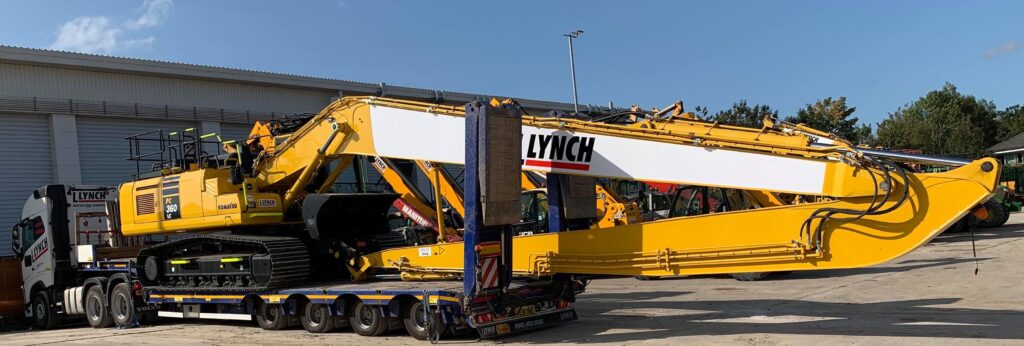
If It could get up the lane (doubtful) then it would easily reach over my buildings and in two buckets would removed everything I need removing!
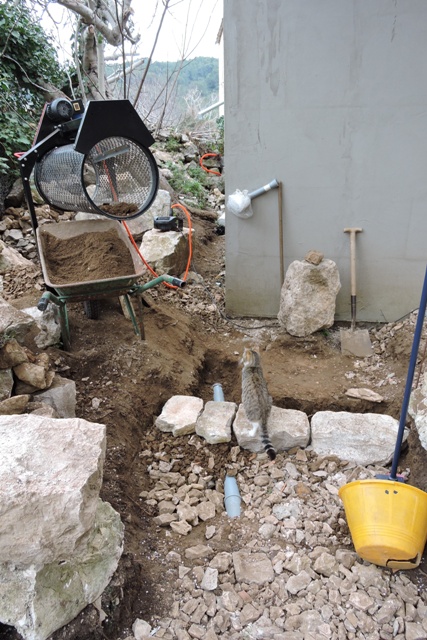
Even without an excavator, I have continued working on the path around the workshop.
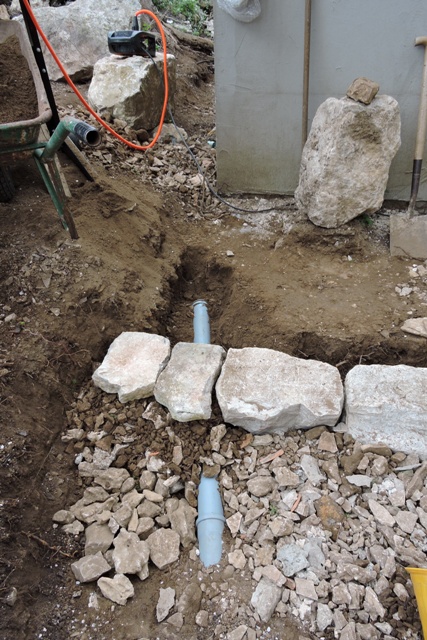
I have extended the rain water drain, closer to the building and have the joints I need to take it further.
After back filling the path with small stones, I have also placed the boundary stones, which will edge up to the path.
Explosive dehiscence
It comes as no surprise to me now, that at this point in the spring here in Dol, the weeds are growing like crazy. It happens every year at this time.
Every living thing has developed over thousands of years, a mechanism to reproduce.
Generally this evolution has developed the most efficient way possible.
By the middle of summer here, it is too inhospitable for most plants, so there is a race to grow, flower and set seed, before the heat of the dry season arrives.
I had noticed that in the top orchard the Hairy Bittercress, Cardamine hirsuta, has grown in the space of a week and is in flower.

In the Mediterranean climate this weed can complete several generations in a single year, in the spring and then again in the autumn. It can grow, flower and set seed in just three weeks.
The plant is edible, but to be honest, I don’t collect it to eat. Instead, it all goes on the compost heap.

What I did need to do urgently, was to stop the seeds ripening in their pods and then being broadcast.
After flowering and the seeds have matured, their means of dispersal is by the explosive release of the seeds from the pod.
This is a process called Ballochory or explosive dehiscence.
This process hurls seeds many meters from the parent plant and significantly spreads the population.
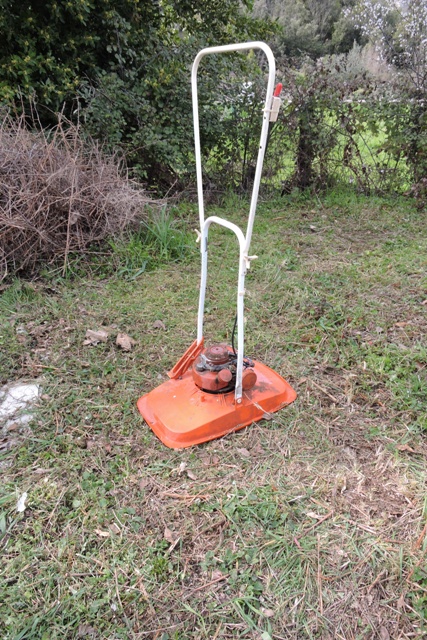
Caught in the nick of time
I have continued with my “No Dig” programme in the orchards.
For several years I have tried to eradicate the most pernicious weeds by various methods.
However all the effort required did not result in the eradication of the problem weed population that I was hoping for.
Part of that is because of the amount of wind borne seeds which arrive every year. Much comes from the Maquis around my home.
The second issue is the volume of seeds that are present in my soil’s weed seed bank.
Early in the spring, I decided that I would try cutting the weeds down regularly this year, to keep them in check. Now seems like the time to put the plan to the test.
I dug my ancient petrol Flymo out of the garden shed a few weeks back. However, when it failed to start I put it to one side while I got on with other higher priority jobs.
On Thursday morning the bright morning sun was both illuminating and warming the courtyard. I lifted the machine up on a B&D Workmate to see if I could fix what ever the problem was.
I knew it was around fuel not getting to the carburettor mixing chamber, so I started by taking the carburettor off the engine.
As far as I can remember, I bought this machine around 1983 from East Yorkshire Mowers in Hessle.
The engine was brand new, but its base had been an electric Flymo that had been converted to petrol. So the everything is close to or well over 40 years old.
In the time that I have had it, on three continents, I have never serviced it. I’ve done nothing more than fill it with fuel and clean debris from it after use.
Disassembling the carbuator was not difficult. Just two M8 nuts and thrust washers held it onto the engine.
I then spent a few minutes removing the years of accumulated dust and fuel residue from the metal work.
I had suspected that the membrane in the float chamber might had failed. But when I took the top off the chamber, there was a thimble full of bone dry dust and grass inside. The membrane was fine.
Everthing was cleaned and blown through with compressed air. Then before being reassembled, I lubricated the engine grease and silicone and reassembled it.
As soon as everything was back in place, I added fuel and tried to start the mower. The engine fired straight away. I let the engine warm up for a minute or two without any load, before I took it down to the very bottom of the orchard.
After 30 minutes , I had taken the top off every weed, and all the grasses. I think I have caught the weeds in the nick of time before they were able to set seed and spread.
This first run over the orchard caught a few stones but handled even the stumps of the bramble briars with ease. All I need to do now, is to run over the area regularly with the mower.
The non-standard EU
There are supposed to be common standards across all of the 27 countries of the EU. My experience is that while there are many common standards, there are still huge gaps which adversely affect consumers.
This week I wanted to put a handle on the door into the electro-mechanical plant room.
The door was new last year, bought from Bauhaus in Split. I have a DormaKABA key-suite system, with just one key to open all locks.
I fitted a KABA Gemini Euro-standard cylinder lock in the door.
No problem so far. The cylinder lock fitted the door lock mechanism without a problem. When I neded to open the door, I could just use the key.
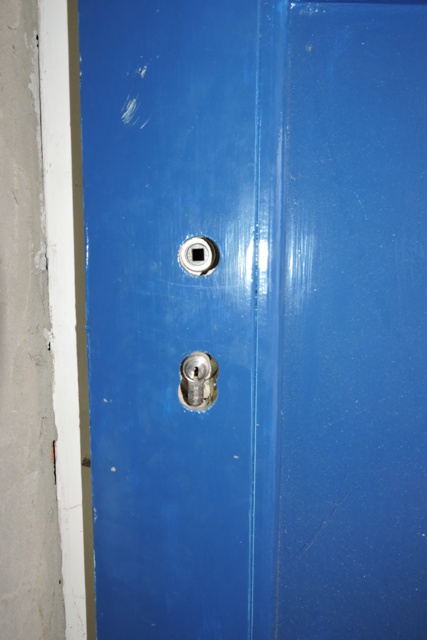
While I was at the Volat builders Merchants in Stari Grad this week, I bought a nice brushed stainless steel handle set. There were dozens to choose from, and although I would have preferred black, stainless steel was an acceptable alternative.
Taking the face plate out of the packet and offering it up to the door once I was back at home, there was an immediate problem. The holes in the plate were not in the right place to match the standard fittings on the door.

Back down at Volat, there was no problem in exchanging the door furniture. The problem was actually finding a face plate that would fit my door.
In short, there were none. What I did find was a two piece solution, which happened to be Black Japanned or powder coated. Just what I originally wanted.
It was just a few minutes work once I was back at home, to fit the lock covers and handles.
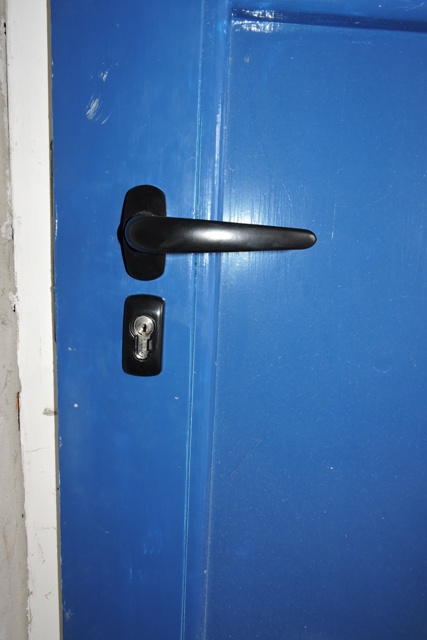
It is just the latest in a long line of examples that I have, of just how non-standard the EU is!
Sparks fly
My friend Cvjetco came on Friday to continue work around my home.
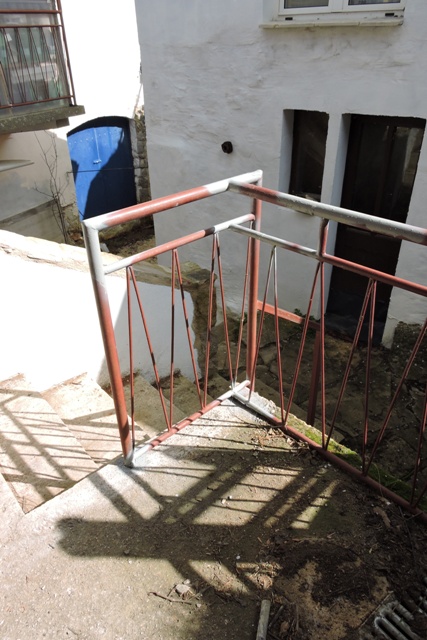
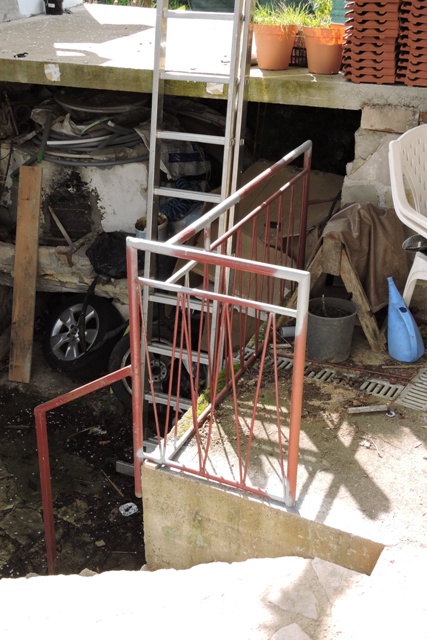
The first of two tasks this week was the fitting of a balustrade to the steps up to my patio.
The second was making good the wall in the electro-mechanical plant room, so I can wire up the electrics.
I don’t like throwing things away. Yes, I know, it’s known as hoarding!
However it does mean that when you need matching steelwork, I have the necessary pieces in my architectural salvage area.
Various pieces of the old steel balustrade that I removed last year were cut to size first.
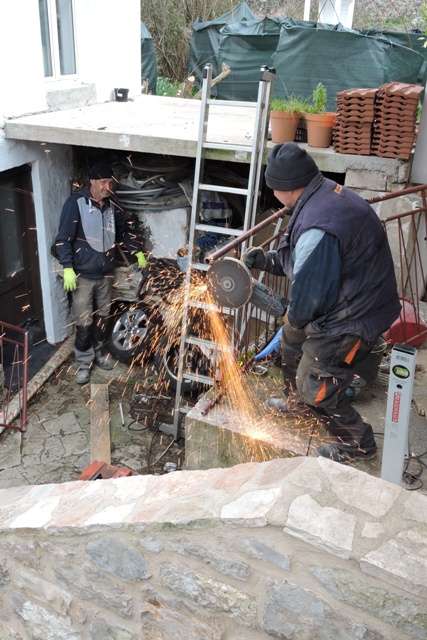
Then the various pieces were lightly tack welded together, to get everything into place.
Once this was done, the whole balustrade was completely welded together.
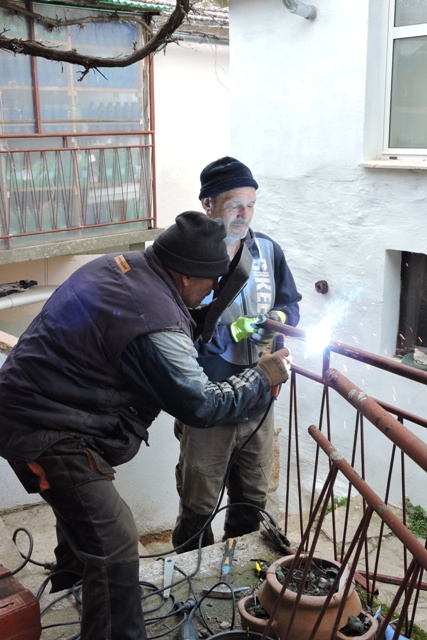
All the joints were cleaned with excess metal being removed, leaving bare metal. I then gave all the new joints two coats of a rust proofing primer paint to seal them.
The smallest room
Doing a major refurbishment of buildings which are more than a century old requires a clear vision of what the end product will look like, and a lot of planning.
In my time of restoring and refurbishing property, I’ve gone from two wire telephone cables, through COAX 10BaseT network cable, 100BaseT thin ethernet to the latest CAT 6e cabling standards.
Along the way, internet connections have gone from external dial-up modems, 16 Bit Modem cards to transistorised RJ16 connections built into computer’s hardware.
Now of course, WiFi wireless is connecting everything from fridges and microwaves to the Amazon Alexa on my desk.
You sinply cannot plan for the next leap in innovation because you do not know what it will be.
But what you can do is to include in the infrastructure of your home, the space and facilities for whatever the next change will be. This is what I have actively done since I bought my home in Dol.
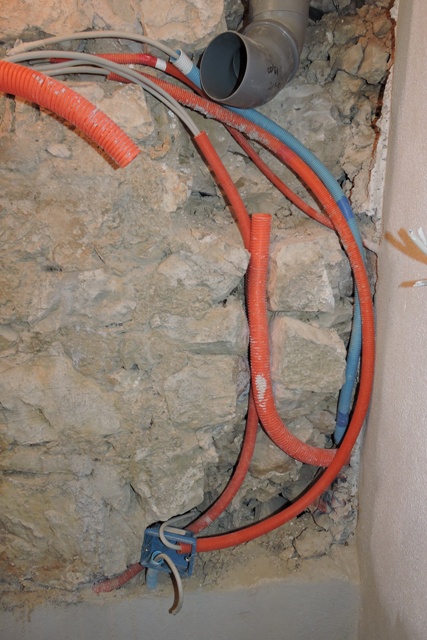
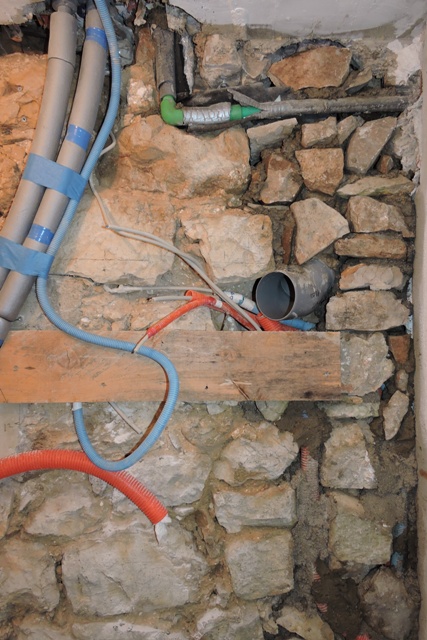
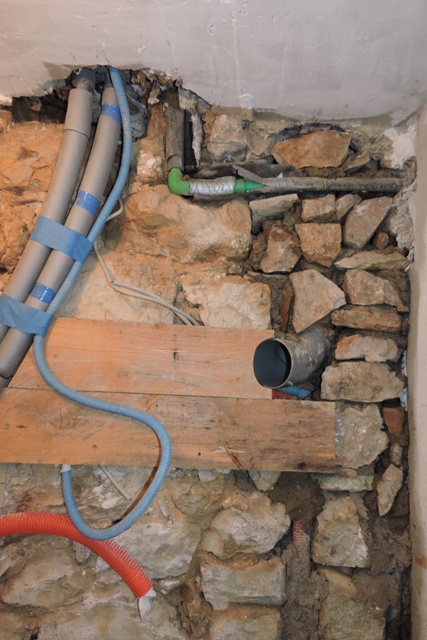
As part of the new build last year, I had a small room included as the electro-mechanical plant room.
This is where I will (eventually) have the system for converting the rooftop PV cells power into 220VAC. The room is separate so it can hold batteries. These must be physically isolated from the rest of the buildings and it has its own fire safety systems.
Part of the planning does not just include the current electric distribution Consumer Unit, but also conduit for cabling that will happen in the future.
To install cables once the walls have been decorated will make a mess.
So I have included a 12 cm diameter pipe which runs from the room to the roof above the first floor, with junctions in appropriate places.
This is to make it easy to add a new cable or to remove an old one at any point in the future.
This week I’ve been doing work inside this room.
All the cables are marked, showing what they are/where they are from/to. Conduits are in place so cables can be added in the future. Cvjetko did the first phase of rendering the wall this week, by filling in the holes with stones.
I need to mount the junctions boxes and Consumer Unit on a flat surface, so I cut some 25 mm board to fit. But the boards also needs to fit around the exit point from the 12 cm pipe.
Being at an angle, the exit hole has an oval profile. I first drew this on some ribbed paper and cut out the oval opening.
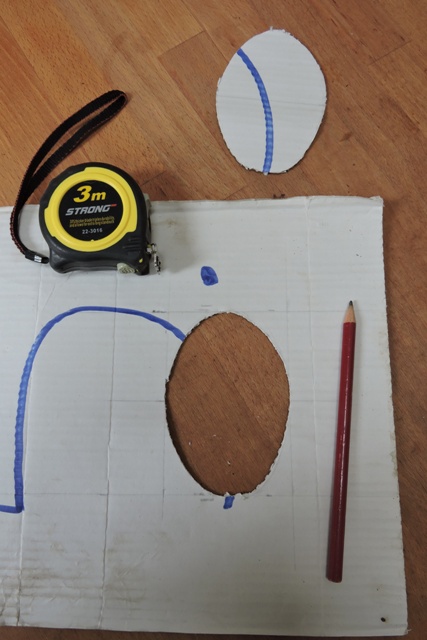
When I checked the profile against the pipe, this was a perfect fit. Next I cut the end of a board to match.
I then mounted the bottom of the two boards to the wall.
Because the wall behind is rough stones, there was a lot of careful measuring and marking to make sure that where I drilled would be into solid rock.
The smaller board is a perfect fit.
As always, the weeks in Dol are too short.
Stopping work at lunch time on Saturday, I have made a lot of progress, and have a list of things to do next week, before Cvjetko returns. When he comes back he’ll finish the wall and cover all the services in render, with just the junction boxes and consumer unit visible.
I have recorded where every utility is, just in case I ever need to find one in the future.
A lick of paint when it is all dry and I’ll be ready to wire everything up.
However before then, I need the COVID situation to have eased somewhat. This is to make it safe to go to the mainland for more supplies. NCG
One Response
Paul H
Norman, hope you have fed a line through the installed piping – makes it easier to pull other cables through – remember to pull another line through at the same time, It can save you a lot of time.